MayaScripts_FollowCamCreator : ノードを追従するカメラの生成
2022/11/26 Update
こんにちは。
さて、今回もアニメーション制作時の面倒ごとを一つ片づける為の小スクリプトを置いておきます。
FollowCamCreator
アニメーション制作中、キャラクターは 常にカメラに捉えておきたいものです。
ただ、走りや大ジャンプ、大きな移動値を持つアニメーションの制作時に、
FIXのカメラではキャラクターがカメラの外に行ってしまいます。
他にも、手足の指のアニメーション制作時なんかは、常に手足をカメラ内に押さえて欲しいでしょう。
いちいちカメラを動かすのも 面倒 なので、今日からはコレを使いましょう。
選択した対象ノードに対して追従するカメラをボタン一つで作成できます。
ちょっとしたオプションもあるよ。
■ インストール
C:\Users\ユーザー名\Documents\maya\scripts
上記の場所に以下のコードをPythonFileとして、保存してください。
# -*- coding:utf-8 -*-

import pymel.core as pm

VERSION = "1.2"

print ("-*- import FollowCamCreator.{0} -*-".format(VERSION))

WINDOWNAME = "FollowCam"
WINDOWSIZE = [150,196]
TRANSLATE_ATTR = ["tx","ty","tz"]
SWITCH_CAMERA = True

def __bakeAnim (target_node, target_attribute):
    # type:(pm.PyNode, list[str]) -> None

    framerange = [
        pm.playbackOptions(q = True, min = True),
        pm.playbackOptions(q = True, max = True),
        ]

    attributes = [target_node.attr(a) for a in target_attribute]

    pm.refresh(su = True)
    pm.bakeResults(attributes, t = framerange, sm = True, pok = True)
    pm.refresh(su = False)

def __setPointContraints (src_node, dst_node, target_attribute):
    # type:(pm.PyNode, pm.PyNode, list[str]) -> list[pm.PyNode]

    skip_attribute = list()

    for a in TRANSLATE_ATTR:
        if a in target_attribute : continue
        skip_attribute.append(a.replace("t",""))

    return pm.pointConstraint(src_node, dst_node, skip = skip_attribute, mo = False)

def __getActiveModelEditor ():
    # type:() -> pm.uitypes.ModelEditor

    for e in pm.lsUI(ed = True):
        if type(e) == pm.uitypes.ModelEditor and e.getActiveView():
            return e

    return None


def __createFollowCam (target_attribute, withRotation, withBake):
    # type:(list[str], bool, bool) -> list[pm.PyNode]

    selection = pm.selected()
    if not selection or (not target_attribute and not withRotation):
        print ("\nCanceled.")
        return None

    __deleteExitWindow()

    src_node = selection[0]
    name = "FollowCam_{0}".format(src_node.name(stripNamespace = True))

    print ("\nsrc_node:\t{0}\nattribute:\t{1}\nrotation:\t{2}\nanim_bake:\t{3}".format(src_node.name(), target_attribute, withRotation, withBake))

    cam_root = pm.spaceLocator(n = name)
    cam_nodes = pm.camera(name = name + "_CAM")
    cam_transform = cam_nodes[0]
    cam_transform.setParent(cam_root)

    if withRotation:
        pm.orientConstraint(src_node, cam_root)

    constraint_nodes = __setPointContraints(src_node, cam_root, target_attribute)

    if withBake:
        __bakeAnim(cam_root, target_attribute)
        pm.delete(constraint_nodes)

    if SWITCH_CAMERA:
        active_viewport = __getActiveModelEditor()
        active_viewport.setCamera(cam_nodes[1])

    result = [cam_root] + cam_nodes

    pm.select(result)
    pm.headsUpMessage("-*- FollowCamCreate done. : {0} -*-".format(cam_root))

    return result


def __getCheckedAttr (checkboxes):
    # type:(list[pm.uitypes.CheckBox]) -> list[str]

    attributes = list()

    for i in list(range(0, len(TRANSLATE_ATTR))):
        if checkboxes[i].getValue():
            attributes.append(TRANSLATE_ATTR[i])

    return attributes


def __deleteExitWindow (*arg):

    if pm.window(WINDOWNAME, q = True, ex = True):
        pm.deleteUI(WINDOWNAME)


def __checkAll (checkboxes) :
    # type:(list[pm.uitypes.CheckBox]) -> None

    if False not in [c.getValue() for c in checkboxes]:
        checkboxes[0].setValue(False)
        checkboxes[1].setValue(False)
        return

    for c in checkboxes:
        c.setValue(True)


def __showUI ():
    # type:() -> None

    __deleteExitWindow()

    with pm.window(WINDOWNAME, mnb = False, mxb = False, s = False) as w:

        w.setWidthHeight(WINDOWSIZE)

        with pm.columnLayout(adj = True, rs = 5):

            pm.text(l = "Select Follow Axis", bgc = [0.9,0.5,0.3])

        with pm.columnLayout(adj = True, rs = 5, co = ["both", 10]):

            pm.separator(h = 6) # ---------------------------------------

            with pm.rowLayout(nc = 4):

                attr_checkboxes = [
                    pm.checkBox(l = "X", w = 48),
                    pm.checkBox(l = "Y", w = 48),
                    pm.checkBox(l = "Z", v = True)
                ]

            check_all_cmd = lambda *arg : __checkAll(attr_checkboxes)
            pm.button(l = "Check All", h = 17, c = check_all_cmd)

            pm.separator(h = 6) # ---------------------------------------

            wr = pm.checkBox(l = "With Rotation", v = False)
            wb = pm.checkBox(l = "With AnimBake", v = False)

            pm.separator(h = 6) # ---------------------------------------

            with pm.rowLayout(nc = 2, h = 36) as r:

                r.rowAttach([(1, "both", 0), (2, "both", 0)])

                main_cmd = lambda *arg : __createFollowCam(__getCheckedAttr(attr_checkboxes), wr.getValue(), wb.getValue())
                pm.button(l = "OK", w = 61, c = main_cmd)
                pm.button(l = "Cancel", w = 61, c = __deleteExitWindow)


def main () :

    if pm.getModifiers() == 5:
        __showUI()
        return
    __createFollowCam(TRANSLATE_ATTR, False, False)
その後、MayaのシェルフやHotKeyに以下の2行のスクリプトを保存してください。
import FollowCamCreator
FollowCamCreator.main()
■ 使い方
適当なノードを選択した状態で実行 すると、MayaのPointConstraintにて「選択された対象を追従するカメラノード」を生成します。
生成後はアクティブなビューポートのカメラを生成したカメラに切り替えます。
それと、「 Shift + Ctrl 」 を押した状態で実行すると、下図のようなオプション用のUIが立ち上がります。
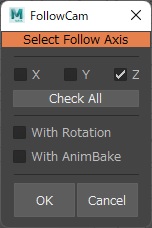
- オプション項目
■ 余談
こういうちょっとしたスクリプトのUIを作るときも、なるべくレイアウトをキレイに整えたいんだけど・・・、MayaのデフォルトのUI作成コマンドだけでやると、正直むちゃくちゃめんどくさい。思った通りのマージンやサイズにならねえ。
やっぱりQtDesignerとか使った方がいいんですかね~。
宗教上の理由であんまり使いたくないから、普段これよりも複雑なUI作るときは、MayaのFormLayoutをある程度簡単に使えるようにした自前のスクリプトで抵抗しています。
とは言え、Qtはレイアウトだけじゃなく、ボタンからのコマンドとかユーザーからのアクションに対しても柔軟に対応できたりと、勉強するだけのメリットがあるのはワカル。まぁいつかブログで備忘録紹介できる程度には学習したいと思います。
それでは。